- Identify stakeholders
- Describe the categories of sensitive information to protect
- Set goals and strategy
SKU/subscriptions licensing
Before you start using DLP policies, confirm your Microsoft 365 subscription and any add-ons.
Permissions
The account you use to create and deploy policies must be a member of one of these role groups
- Compliance administrator
- Compliance data administrator
- Information Protection
- Information Protection Admin
- Security administrator
Be sure you understand the difference between an unrestricted administrator and an administrative unit restricted administrator by reading Administrative units before you start.
Granular Roles and Role Groups
There are roles and role groups that you can use to fine tune your access controls.
Here's a list of applicable roles. To learn more, see Permissions in the Microsoft Purview compliance portal.
- DLP Compliance Management
- Information Protection Admin
- Information Protection Analyst
- Information Protection Investigator
- Information Protection Reader
Here's a list of applicable role groups. To learn more, see To learn more about them, see Permissions in the Microsoft Purview compliance portal.
- Information Protection
- Information Protection Admins
- Information Protection Analysts
- Information Protection Investigators
- Information Protection Readers
Policy creation scenarios
The previous article Design a DLP policy introduced you to the methodology of creating a policy intent statement and then mapping that intent statement to policy configuration options. This section takes those examples, plus a few more and walks you through the actual policy creation process. You should work through these scenarios in your test environment to familiarize yourself with the policy creation UI.
There are so many configuration options in the policy creation flow that it's not possible to cover every, or even most configurations. So this article covers several of the most common DLP policy scenarios. Going through these gives you hands on experience across a broad range of configurations.
Scenario 1 Block emails with credit card numbers
This is a hypothetical scenario with hypothetical values. It's only for illustrative purposes. You should substitute your own sensitive information types, sensitivity labels, distribution groups and users.
Scenario 1 prerequisites and assumptions
This scenario uses the Highly confidential sensitivity label, so it requires that you have created and published sensitivity labels. To learn more, see:
- Learn about sensitivity labels
- Get started with sensitivity labels
- Create and configure sensitivity labels and their policies
This procedure uses a hypothetical distribution group Finance team at Contoso.com and a hypothetical SMTP recipient adele.vance@fabrikam.com.
Scenario 1 policy intent statement and mapping
We need to block emails to all recipients that contain credit card numbers or that have the ‘highly confidential’ sensitivity label applied except if the email is sent from someone on the finance team to adele.vance@fabrikam.com. We want to notify the compliance admin every time an email is blocked and notify the user who sent the item and no one can be allowed to override the block. Track all occurrences of this high risk event in the log and we want the details of any events captured and made available for investigation
| Statement | Configuration question answered and configuration mapping |
|---|---|
| "We need to block emails to all recipients. " | - Where to monitor: Exchange - Administrative scope: Full directory - Action: Restrict access or encrypt the content in Microsoft 365 locations > Block users from receiving email or accessing shared SharePoint, OneDrive, and Teams files > Block everyone |
| ". that contain credit card numbers or have the 'highly confidential' sensitivity label applied. " | - What to monitor use the Custom template - Conditions for a match edit it to add the highly confidential sensitivity label |
| ". except if. " | - Condition group configuration: Create a nested boolean NOT condition group joined to the first conditions using a boolean AND |
| ". the email is sent from someone on the finance team. " | - Condition for match: Sender is a member of |
| ". and. " | - Condition for match: add a second condition to the NOT group |
| ". to adele.vance@fabrikam.com. " | - Condition for match: Recipient is |
| ". Notify. " | - User notifications: enabled - Policy tips: enabled |
| ". the compliance admin every time an email is blocked and notify the user who sent the item. " | - Policy tips: enabled - Notify these people: selected - The person who sent, shared, or modified the content: selected - Send the email to these additional people: add the email address of the compliance administrator |
| ". and no one can be allowed to override the block. | - Allow overrides from M365 Services: not selected |
| ". Track all occurrences of this high risk event in the log and we want the details of any events captured and made available for investigation." | - Use this severity level in admin alerts and reports: high - Send an alert to admins when a rule match occurs: selected - Send alert every time an activity matches the rule: selected |
Steps to create policy for scenario 1
For the purposes of this policy creation procedure, you'll accept the default include/exclude values and leave the policy turned off. You'll be changing these when you deploy the policy.
Select the appropriate tab for the portal you're using. To learn more about the Microsoft Purview portal, see Microsoft Purview portal. To learn more about the Compliance portal, see Microsoft Purview compliance portal.
- Microsoft Purview portal
- Compliance portal
Select Block everyone.
Scenario 2 Block sharing of sensitive items via SharePoint and OneDrive in Microsoft 365 with external users
For SharePoint and OneDrive in Microsoft 365, you create a policy to block sharing of sensitive items with external users via SharePoint and OneDrive.
Scenario 2 prerequisites and assumptions
This scenario uses the Confidential sensitivity label, so it requires that you have created and published sensitivity labels. To learn more, see:
- Learn about sensitivity labels
- Get started with sensitivity labels
- Create and configure sensitivity labels and their policies
This procedure uses a hypothetical distribution group Human Resources and a distribution group for the security team at Contoso.com.
Scenario 2 policy intent statement and mapping
We need to block all sharing of SharePoint and OneDrive items to all external recipients that contain social security numbers, credit card data or have the "Confidential" sensitivity label. We do not want this to apply to anyone on the Human Resources team. We also have to meet alerting requirements. We want to notify our security team with an email every time a file is shared and then blocked. In addition, we want the user to be alerted via email and within the interface if possible. Lastly, we don’t want any exceptions to the policy and need to be able to see this activity within the system.
| Statement | Configuration question answered and configuration mapping |
|---|---|
| “We need to block all sharing of SharePoint and OneDrive items to all external recipients. ” | - Administrative scope: Full directory - Where to monitor: SharePoint sites, OneDrive accounts - Conditions for a match: First Condition > Shared outside my org - Action: Restrict access or encrypt the content in Microsoft 365 locations > Block users from receiving email or accessing shared SharePoint, OneDrive > Block only people outside your organization |
| ". that contain social security numbers, credit card data or have the "Confidential" sensitivity label. ” | - What to monitor: use the Custom template - Condition for a match: Create a second condition that is joined to the first condition with a boolean AND - Conditions for a match: Second condition, first condition group > Content contains Sensitive info types U.S. Social Security Number (SSN), Credit Card Number - Condition group configuration Create a second Condition group connected to the first by boolean OR - Condition for a match: Second condition group, second condition > Content contains any of these sensitivity labels Confidential. |
| “. We don't want this to apply to anyone on the Human Resources team. ” | - Where to apply exclude the Human Resources Team OneDrive accounts |
| ". We want to notify our Security team with an email every time a file is shared and then blocked. " | - Incident reports: Send an alert to admins when a rule match occurs - Send email alerts to these people (optional): add the Security team - Send an alert every time an activity matches the rule: selected - Use email incident reports to notify you when a policy match occurs: On - Send notifications to these people: add individual admins as desired - You can also include the following information in the report: Select all options |
| ". In addition, we want the user to be alerted via email and within the interface if possible. ” | - User notifications: On - Notify uses in Office 365 with a policy tip: selected |
| “. Lastly, we don’t want any exceptions to the policy and need to be able to see this activity within the system. ” | -User overrides: Not selected |
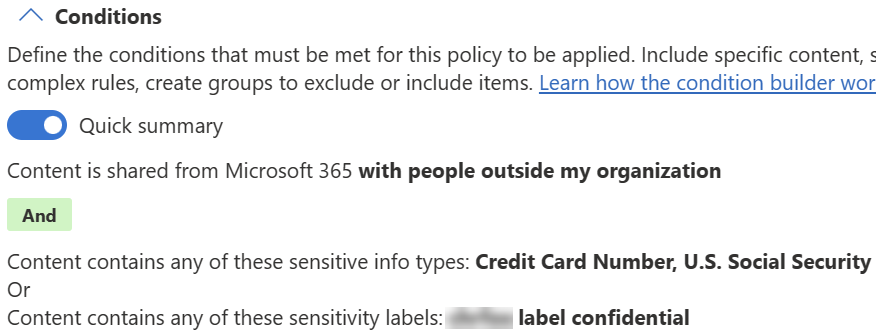
When the conditions are configured, the summary looks like this:
Steps to create policy for scenario 2
For the purposes of this policy creation procedure you'll leave the policy turned off. You change these when you deploy the policy.
Select the appropriate tab for the portal you're using. To learn more about the Microsoft Purview portal, see Microsoft Purview portal. To learn more about the Compliance portal, see Microsoft Purview compliance portal.
- Microsoft Purview portal
- Compliance portal
- Ensure that the the SharePoint sites and OneDrive accounts locations are selected.
- Deselect all other locations.
- Select Edit in the Scope column next to OneDrive accounts.
- Select All users and groups and then select Exclude users and groups.
- Choose +Exclude and then Exclude groups.
- Select Human Resources.
- Choose Content is shared from Microsoft 365.
- Select with people outside my organization.
- Select Content contains.
- Restrict access or encrypt the content in Microsoft 365 locations.
- Block only people outside your organization.
- Set Use this severity level in admin alerts and reports to Low.
- Set the toggle for Send an alert to admins when a rule match occurs to On.
**Endpoint DLP settings** > **Browser and domain restrictions to sensitive data** > **Sensitive service domains**. 1. Select **Add a new group of sensitive service domains**. 1. Name the group. 1. Select the **Match type** you want. You can select from **URL**, **IP address**, **IP address range**. 1. Type in the appropriate value in the **Add new service domains to this group**. You can add multiple websites to a group and use wildcards to cover subdomains. For example, `www.contoso.com` for just the top level website or \*.contoso.com for corp.contoso.com, hr.contoso.com, fin.contoso.com 1. Select **Save**. 1. Select **Policies**. 1. Create and scope a policy that is applied only to **Devices**. See, [Create and Deploy data loss prevention policies](dlp-create-deploy-policy.md)) for more information on how to create a policy. 1. Create a rule that uses the **the user accessed a sensitive site from Edge**, and the action **Audit or restrict activities when users access sensitive sites in Microsoft Edge browser on Windows devices**. 1. In the action select **Add or remove Sensitive site groups**. 1. Select the **Sensitive site groups** you want. Any website under the group(s) you select here will be redirected to Edge when opened in Chrome browser (with Purview extension installed). 1. Select **Add**. 1. Select the user activities you want to monitor or restrict and the actions you DLP to take in response to those activities. 1. Finish configuring the rule and policy and apply it. -->
Deployment
A successful policy deployment isn't just about getting the policy into your environment to enforce controls on user actions. A haphazard, rushed deployment can negatively impact business process and annoy your users. Those consequences slow acceptance of DLP technology in your organization and the safer behaviors it promotes. Ultimately making your sensitive items less safe in the long run.
Before you start your deployment, make sure you have read through Policy deployment. It gives you a broad overview of the policy deployment process and general guidance.
This section dives more deeply into the three types of controls you use in concert to manage your policies in production. Remember you can change any of these at any time, not just during policy creation.
Three axes of deployment management
There are three axes you can use to control the policy deployment process, the scope, the state of the policy, and the actions. You should always take an incremental approach to deploying a policy, starting from the least impactful/simulation mode through to full enforcement.
Recommended deployment control configurations
| When your policy state is | Your policy scope can be | Impact of policy actions |
|---|---|---|
| Run the policy in simulation mode | Policy scope of locations can be narrow or broad | - You can configure any action - No user impact from configured actions - Admin sees alerts and can track activities |
| Run the policy in simulation mode with policy tips | Policy should be scoped to target a pilot group and then expand the scope as you tune the policy | - You can configure any action - No user impact from configured actions - Users can receive policy tips and alerts - Admin sees alerts and can track activities |
| Turn it on | All targeted location instances | - All configured actions are enforced on user activities - Admin sees alerts and can track activities |
| Keep it off | n/a | n/a |
State
State is the primary control you use to roll out a policy. When you finished creating your policy, you set the state of the policy to Keep it off. You should leave it in this state while you're working on the policy configuration and until you get a final review and sign off. The state can be set to:
- Run the policy in simulation mode: No policy actions are enforced, events are audited. While in this state, you can monitor the impact of the policy in the DLP simulation mode overview and the DLP Activity explorer console.
- Run the policy in simulation mode and show policy tips while in simulation mode: No actions are enforced, but users receive policy tips and notification emails to raise their awareness and educate them.
- Turn it on right away: This is full enforcement mode.
- Keep it off: The policy is inactive. Use this state while developing and reviewing your policy before deployment.
You can change the state of a policy at any time.
Actions
Actions are what a policy does in response to user activities on sensitive items. Because you can change these at any time, you can start with the least impactful, Allow (for devices) and Audit only (for all other locations), gather and review the audit data, and use it to tune the policy before moving to more restrictive actions.
-
Allow: The user activity is allowed to occur, so no business processes are impacted. You get audit data and there aren't any user notifications or alerts.
Note For Exchange online and SharePoint in Microsoft 365, overrides are configured in the user notification section.
Policy scope
Every policy is scoped to one or more locations, such as Exchange, SharePoint in Microsoft 365, Teams, and Devices. By default, when you select a location, all instances of that location fall under the scope and none are excluded. You can further refine which instances of the location (such as sites, groups, accounts, distribution groups, mailboxes, and devices) that the policy is applied to by configuring the include/exclude options for the location. To learn more about your include/exclude scoping options, see, Locations.
In general, you have more flexibility with scoping while the policy is in Run the policy in simulation mode state because no actions are taken. You can start with just the scope you designed the policy for or go broad to see how the policy would impact sensitive items in other locations.
Then when you change the state to Run the policy in simulation mode and show policy tips, you should narrow your scope to a pilot group that can give you feedback and be early adopters who can be a resource for others when they come onboard.
When you move the policy to Turn it on right away, you broaden the scope to include all the instances of locations that you intended when the policy was designed.
Policy deployments steps
- After you've created the policy and set its state to Keep it off, do a final review with your stakeholders.
- Change the state to Run the policy in simulation mode. The location scope can be broad at this point so you can gather data on the behavior of the policy across multiple locations or just start with a single location.
- Tune the policy based on the behavior data so that it better meets the business intent.
- Change the state to Run the policy in simulation mode and show policy tips. Refine the scope of locations to support a pilot group if needed and make use of includes/excludes so that the policy is first rolled out to that pilot group.
- Gather user feedback and alert and event data, if needed tune the policy and your plans more. Make sure you address all the issues that your users bring up. Your users will most likely encounter issues and raise questions about things that you didn't think of during the design phase. Develop a group of super users at this point. They can be a resource to help train other users as the scope of the policy is increased and more users come onboard. Before you go to the next stage of deployment, make sure that the policy is achieved your control objectives.
- Change the state to Turn it on right away. The policy is fully deployed. Monitor DLP alerts and DLP activity explorer. Address alerts.