
Traveling to India as a U.S. citizen has become more accessible post-pandemic, with streamlined visa processes. In this comprehensive step-by-step guide, I’ll walk you through the steps to show you how to get your Indian visa if you’re a U.S. citizen. Understanding the visa application process is essential for a smooth journey and with that out of the way, you can focus on your India trip planning.
This post contains affiliate links. I highly recommend trip insurance on your adventures. Use this trip insurance finder tool to find an plan based on your budget! Check out affordable U.S. trip insurance.
Table of Contents: A Step-by-Step Guide to Applying for an India Tourist Visa (for U.S. Citizens)
There are two ways to apply for your Indian Tourist Visa: the regular paper India visa application and the Indian e-Visa. Both options offer the same visa types and durations.
But the differences end there. Determining which to get is based upon how you wish to use it in entry points and how much cost and processing time you can afford. From a tourist standpoint, the only caveat to getting a regular paper India visa is that you will have more flexibility with entry points as they are not only limited to airport access, but sea and land as well. When I was researching how to do an overland passage to India after my group adventure in Pakistan, crossing the Wagah-Attari border into Amritsar required the regular Indian tourist visa .
With the regular India tourist visa, the price is also more expensive with the VFS mail-in/courier process and processing time can be much longer, especially if there is an issue with your application or documents. The paper Indian tourist visa is a process you will need to start well over a month in advance of your travel dates.
Meanwhile, the Indian e-Visa can be done online and you’ll get it lickety-split and for tons cheaper. It’s almost as if the Indian government prefers for tourists to just get the Indian e-Visa. The drawback is that you can only enter India via the airport. Land and sea is not allowed.
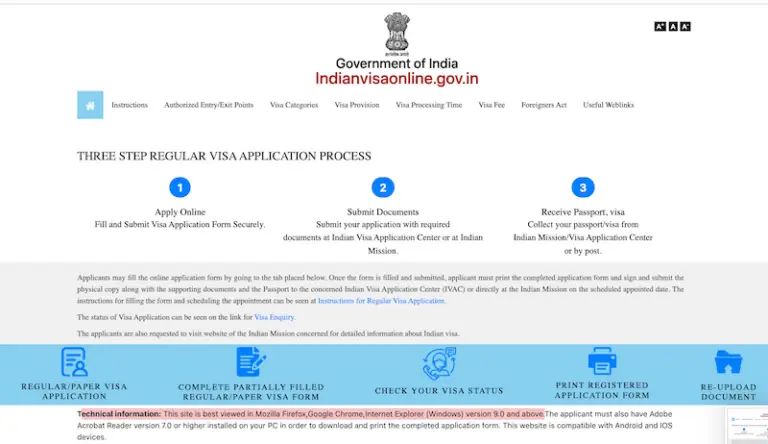
Both regular and eVisa can be accessed through the Indian Visa Online website at https://indianvisaonline.gov.in
Although the India eVisa is a bit tricky and it is in a sub section of the website and they do not link to it (duh!). You won’t be able access the Indian evisa easily unless you Google it or so I’ve listed it here. Note: There are other India visa sites that you’ll find on the internet, but this is the official one. I don’t believe the other sites are scams, but you may end up paying more to get it expedited through one of the other visa sites.
Gather these following documents for a successful application:
In the past, getting an Indian tourist visa was complex. After the pandemic, requirements changed and they made it much easier to get a tourist visa, a long term visa (i.e. 5 year and 10 year) and multiple entry. But there’s still aspects that can be confusing to U.S. travelers.
Applying for the regular India Tourist Visa (paper or sticker) in your home country is a time consuming route because it is a mail-in service and India uses a third party service to facilitate this process.
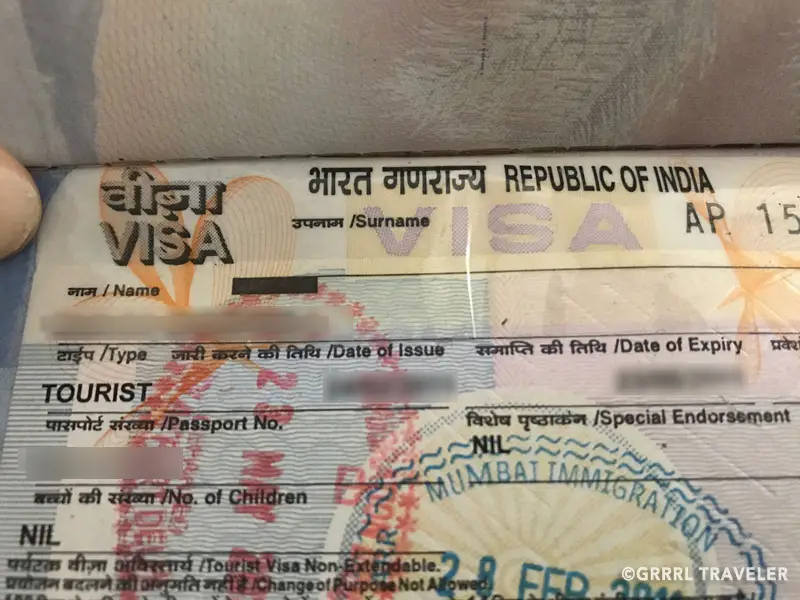
Cost and Duration of regular India Tourist Visa for U.S. Citizens, Entry & Fee
10 Years – Single Entry $178
5 Years – Multiple Entry $178
6 Months – Multiple Entry $178
Getting an Indian Tourist eVisa online is probably the easiest and fastest and cheapest method if you were ever in a hurry and you’re afforded the same amount of stay. But you can only enter through airport entry points.
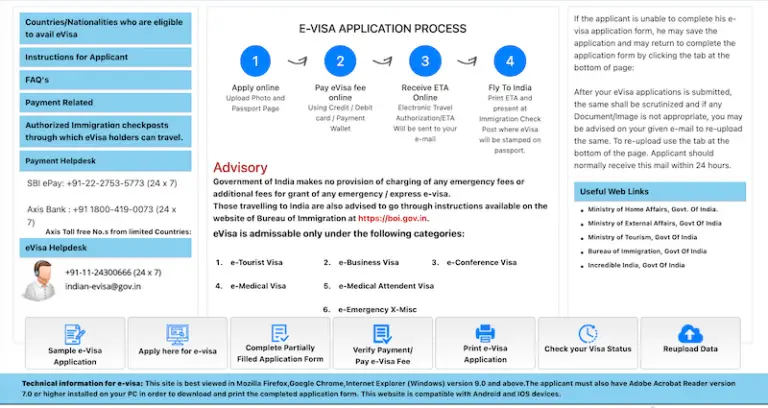
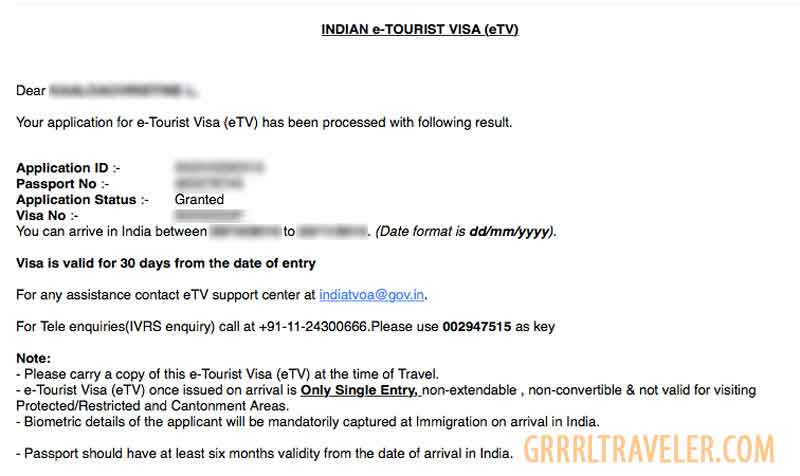
Getting a tourist eVisa for India is an easy online application through the official Government of India Online Visa website. The processing time is quick and easy, and takes around 10-15 minutes. You want to apply at least four days before departure, as validity starts from date of arrival. Once your visa is processed, you will get your visa sent via email and you should print it out as well as have a copy of your visa snapshot on your mobile phone. Your email notification of a granted visa processed an granted IS NOT THE INDIA E-VISA. You must still log into your account and download the actual printable visa. I made this mistake where I thought the email saying that my visa was GRANTED was enough and when I arrived at the check-in gate, I was declined. Luckily, I was able to use the airport WiFi to access the India visa website with my account, where I could download my actual eVisa.
A one year Indian tourist e-visa $40, a five-year Indian tourist visa $80. Expect an 2.5% online fee.
Ensure your visa photo meets these specifications and read carefully because the passport conditions are tricky if you’re submitting documents for an India eVisa.
To be honest, uploading your scanned bio page will take the most amount of time and is probably the trickiest aspect of the entire application process. I despise it.
First, you can scan or take a photo of your passport information page. Whatever you use, you want to make sure the details are sharp, crisp and easy to make out.
Secondly, when you export your jpg or png photo to pdf, it will naturally uprez your photo. So your photo might be 300kb, but after exported into pdf, it can be 3 mb! This is the tricky part, because your image cannot be the regular size of your passport. It must be smaller to get through that upload gate keeper.
My settings were 72 dpi resolution but ultimately, I had to take the size below 500 dpi width. Yep, it’s small, when you view it on the application form but it is bigger when you open your pdf on your laptop. This is why you want to ensure your information is clear and easy to read.
The website is best viewed in Mozilla Firefox, Google Chrome, Internet Explorer (Windows) version 9.0 and Android and iOS.
Listing references for your stay in India is the part which trips up a lot of travelers applying for the Indian visa. This part forces you to lock itinerary details and long-term travelers, digital nomads and flexible travelers -like myself- like to keep part of their trip itinerary open-ended and loose. There are many travelers who visit India on an open backpacking trip and don’t have many solidified details such as hotels or departure dates, so you’re not alone.
If you’re not staying with an Indian friend or family, you can list your hotel or tour company as a reference. I like to use Booking.com. Check out my Ways to Show Proof of Onward Travel. I was inspired to write this article because of this India visa process!
Read the website specifications for the passport photos you must send in. The trickiest part of this is not the visa photo but getting your passport bio data page down to under 500kb as a pdf (tip: it’s small)!
I always make extra copies of my passport photos, for future travel purposes and the fact, if you’re getting an Indian SIM card, you’ll need two photos for your application.
Firstly, if you’re applying for a Tourist visa, then your sole reason for visiting should be Tourism.
If you’re a travel blogger on a press trip with the India tourism board, on a business trip to meet with clients, a travel writer, photographer, freelance/professional media, yoga student (going for yoga teacher certification), etc… do not list these as your professions, unless you’re applying for a Journalist, Business or Student visa. These latter visas require more information and possibly professional credentials.
Acknowledging these professions or any other reason for being in India, outside of tourism, your visa will be under additional scrutiny and you may be declined or flagged.
I claim “Artist” or Salesperson or something standard to a tourist. Even when I did my yoga teacher’s certification, I was told to not mention that unless I wanted the hassle of applying for a Student visa and being a yoga student in India is a casual and touristic thing. It is not the same as attending a Indian university.
If you have a layover in India, and do not plan to leave the airport terminal (and do not need to go past immigration), then you do not need an Indian visa or a transit visa.
However, if your baggage is not checked all the way through to your destination an you need to retrieve it and re-check it, you will need an Indian visa.
Hope this guide on how to apply for an India visa was helpful to you! Applying for an Indian visa can feel overwhelming but visiting India is so worthwhile. Hope you love India as much as I do.